Stacks Image 11

Messmerland Beginner Knitting PatternsĀ©

  • Alex's Pencil Cover

    Skills Needed: Cast On, Knit, and Cast Off.

    Materials:

    Size 10.5 knitting needles, small amount of worsted-weight yarn, and a sewing needle for yarn.

    Directions:

    Cast on 26 stitches.
    Knit every row for 8 rows. (This will make 4 ridges in the garter stitch.)
    Cast off, leaving a tail of yarn about 20 inches long.

    Finishing:

    Thread the sewing needle with the tail of yarn and sew the long sides of the rectangle you made together. Hide the remaining end of yarn by running it under a few stitches so it will not unravel. Cut the end.
    Slide a pencil inside the the knitted tube you made.


    Messmerland Knitting Pattern ©2006. Messmerland Knitting Patterns are free; not for commercial use.

    Stacks Image 249
  • Teddy Bear Scarf

    Skills Needed: Cast On, Knit, and Cast Off.

    Materials:

    Size 10.5 knitting needles, 1 ounce of worsted-weight yarn, and a sewing needle for use with yarn.

    Directions:

    Cast on 10 stitches.
    Knit every row for 70 cm, or the desired length of the scarf.
    Cast off, leaving a 10 cm tail of yarn.

    Finishing:

    Use the yarn sewing needle to hide the ends of yarn under a few stitches before you cut them off. This will prevent unraveling of the scarf.
    A fringe may be added to the ends of the scarf. Learn to Knit or Crochet has directions for making fringe.


    Messmerland Knitting Pattern ©2006. Messmerland Knitting Patterns are free; not for commercial use.

    Stacks Image 251
  • Rebecca's Twisty Headband

    Skills needed: Cast On, Knit, and Cast Off.

    Materials:

    Size 10.5 knitting needles, and small amount of worsted weight yarn.

    Directions:

    Cast on 2 stitches, leaving a tail of yarn about 10 inches long.
    Knit every row for 35 ridges or until the headband is the desired size.
    Cast off, leaving a tail of yarn about 10 inches long.

    Finishing:

    Tie the ends of the tails of yarn together and wear your new headband.


    Messmerland Knitting Pattern © 2008. Messmerland Knitting Patterns are free; not for commercial use.

    Stacks Image 287
  • Long Scarf

    Skills Needed: Cast On, Knit, and Cast Off.

    Materials:

    Size 10.5 needles, (1) 3.5 ounce skein of worsted-weight yarn, and a yarn sewing needle.

    Directions:

    Cast on 20 stitches.
    Knit in the garter stitch (knit every row) until the scarf measures 90 cm.
    Be careful not to stretch the scarf to measure it.
    Cast off the 20 stitches, leaving an end of about 6 inches to weave in and hide with the yarn sewing needle.

    Mini-lesson:

    Sometime, you might come to a knot in the yarn you are using to knit. This is annoying but not unusual. If that happens, do not ignore the knot and keep knitting. You need to take the knot out and put your own super knot in its place. It is best to do this at the beginning or end of a row. Tie your own knot with ends about 5 inches long. Tie only one knot, for the time being. (You will come back to it later and tie a double knot, after you have knitted a few more rows.) don't worry about the ends showing, because we will hide them when you are finished with the scarf.
    After you cast off the scarf stitches, use the yarn sewing needle to darn, or hide the ends by weaving each one into a few stitches along the side or end of the scarf. That way the knot will not come out and cause a hole in your project.

    Finishing:

    You may leave the ends of the scarf plain, or you may want to add some fringe to finish your scarf. Learn to Knit or Crochet has directions for making fringe.

    Messmerland Knitting Patterns ©2006. Messmerland Knitting Patterns are free; not for commercial use.

    Stacks Image 285
  • Carlos & Jon's Whale

    Skills Needed: Cast On, Knit, Decrease, and Cast Off.

    Materials:

    10.5 knitting needles, 1 ounce of worsted weight yarn, a sewing needle for yarn, buttons or eyes, and stuffing.

    Directions:

    Body: (Make two.) Cast on 20 stitches.
    Knit every row for 10 ridges (20 rows).
    Cast off, leaving a tail of yarn 24 inches long.
    Fins: (Make two.) Cast on 10 stitches.
    Knit 1 row. Decrease 1 stitch at the beginning and end of each alternate row, until there are 2 stitches left. Knit those 2 stitches together and end off the fin, leaving a tail 12 inches long.
    Tail: Cast on 15 stitches.
    Knit 1 row. Decrease 1 stitch at the beginning and end of each alternate row, until there are 5 ridges.
    Cast off, leaving a tail 12 inches long.

    Finishing:

    Pin the matching rectangular pieces together on 3 sides. Using one of the tails of yarn you left, sew the pieces together on 3 sides, leaving one side open for stuffing. Take the pins out and turn the bag inside out. Save one of the ends of remaining yarn to use to sew the last side. Put the other end inside the bag. Fill the body with stuffing and sew it closed. End off and hide the end of the yarn inside the body.
    Position each fin and sew it on the body. Sew on the tail. Don't forget to hide the ends of the yarn inside the body, when you are done sewing.
    Note: you can sew the tail on either horizontally or vertically, depending on the type of whale or fish you want to make.
    Add eyes or other decorations to finish your aquatic creation. Remember not to give this project to a small child, if you put things on it that might be a choking hazard.


    Messmerland Knitting Pattern ©2008. Messmerland Patterns are free; not for commercial use.

    Stacks Image 281
  • Kaitlyn's Rainbow Snake

    Skills Needed: Cast On, Knit, Tie a New Yarn at the Beginning of a Row, Increase a Stitch, and Cast Off.

    Materials:

    Size 10.5 needles, 1 ounce each of 6 different colors of worsted-weight yarn, wiggly eyes, felt for a tongue, a small amount of quilt batting, safety pins, and a sewing needle for yarn.

    Directions:

    Cast on 11 stitches with one of your colors.
    Knit every row for 9 ridges. (A ridge equals 2 rows in the garter stitch.)
    Tie in a new color at the beginning of the next row, and knit 9 ridges of that color. Remember not to cut the ends of the yarn too short, when you change colors. Leave about 6 inches of yarn hanging at the edge of the snake. You will tie them off and hide them when the snake is finished.
    Continue to change colors and knit 9 ridges of each yarn, until you come to the last color.
    Increase 1 stitch in the first stitch for a total of 12 stitches and knit 9 ridges of the last color.
    Cast off the remaining 12 stitches leaving a tail of yarn about 3 feet long to use to sew the snake together.

    Finishing:

    What you have knitted is a long rectangle. Fold the snake in half lengthwise and pin about 6 inches of the body together. Sew the edges with the yarn needle and the long tail of yarn for about 6 inches. Cut a piece of quilt batting to equal the length and width of the knitted rectangle. Roll the batting into a tube shape and fit it inside the part of the snake you have sewn together. continue to sew and fill the snake, until you come to the last section. Trim the batting to match the length of the snake without the last section. This section will become the head of the snake.
    Fold the last section the other way (across the width of the snake) to make the head wider than the body. Sew the edges of the head section. Decorate the snake with wiggly eyes and a felt tongue.


    Messmerland Knitting Patterns ©2006. Messmerland Knitting Patterns are free; not for commercial use.

    Stacks Image 289
  • Baby Ball

    Skills Needed: Cast On, Knit, Cast On Stitches at the Beginning of a Row, Cast Off Stitches at the Beginning of a Row, Cast Off.

    Materials:

    Size 10.5 knitting needles, 2 ounces of washable worsted-weight yarn, washable stuffing, several safety pins, and a sewing needle for yarn.
    Note: What you are making is a knitted cube. When it is knitted, it will look like a cross. When it is folded, sewn, and finished, it will look like a box with a lid, until you put the stuffing inside and sew the last seams closed.

    Directions:

    Cast on 15 stitches.
    Knit every row for 30 ridges. (A ridge equals 2 rows in the garter stitch.)
    Cast on 15 stitches at the beginnings of the next 2 rows. You will now have 45 stitches.
    Knit the 45 stitches for 15 ridges.
    Cast off 15 stitches at the beginnings of the next 2 rows. You will now have 15 stitches left to work.
    Knit the remaining 15 stitches for 15 more ridges.
    Cast off all stitches leaving a 6 inch tail.

    Finishing:

    Play with folding the sides until you see the cube shape formed. When you understand how to form a "box", pin two sides together and start to sew the "box" into shape. Pin and sew the seams, one at a time. Do not sew the "lid" closed until you turn the shape right-side out. (You can hide the left-over ends of yarn inside the shape. Remember not to cut them too short or the piece will unravel.) Put the stuffing inside the "box" and sew the remaining edges together.
    When the stuffing is inside the "box" it becomes a Baby Ball. Babies love to play with them. Washable yarn and stuffing make them easy to keep clean, too.


    Messmerland Knitting Pattern ©2006. Messmerland Knitting Patterns are free; not for commercial use.

    Stacks Image 291
  • Knitted Clutch Purse

    Skills Needed: Cast On, Knit With 2 Strands of Yarn, Decrease, Cast Off, and Crochet a Short Chain.

    Materials:

    Size 10.5 knitting needles, 1 ounce each of two colors of worsted-weight yarn, a sewing needle for use with yarn, safety pins, a size H crochet hook, and a 1 inch button.

    Directions:

    Back: Cast on 20 stitches using two colors of yarn as one.
    Knit every row in the garter stitch for 17 ridges (34 rows).
    Knit 2 stitches together (K2 tog) at the beginning of the next 6 rows.
    Cast off the remaining 14 stitches, leaving a 6 inch tail of yarn.
    Front: Cast on 20 stitches.
    Knit every row for 10 ridges (20 rows).
    Cast off, leaving a 6 inch tail of yarn.

    Finishing:

    Pin the bottom edges of the front and back of the purse together. Sew the front and back together along the sides and bottom of the purse, using a double strand of one of your colors, or using both colors. Be sure to hide all of the ends by sewing them under a few stitches, before you cut them.
    Position the button on the lower part of the front of the purse, and sew it in place. Make sure the top of the purse folds to meet the button. Make a short crochet chain to loop around the button and attach it to the middle of the edge of the purse flap, so the loop goes around the button to close the purse. If you do not know how to crochet, you can make a loop by braiding 3 strands of yarn to fit around the button, and sewing the braid in position, too.
    Note: You can make this purse bigger or smaller, by adjusting the number of stitches and the number of rows in the project. You can also add a strap to the purse by crocheting a double strand of yarn to the desired length and attaching it to the sides of the finished purse.


    Messmerland Knitting Patterns ©2006. Messmerland Knitting Patterns are free; not for commercial use.

    Stacks Image 293
    Stacks Image 334
  • "Garter" Snake

    Skills Needed: Cast On, Knit, Increase a Stitch, Decrease a Stitch, and Cast Off.

    Materials:

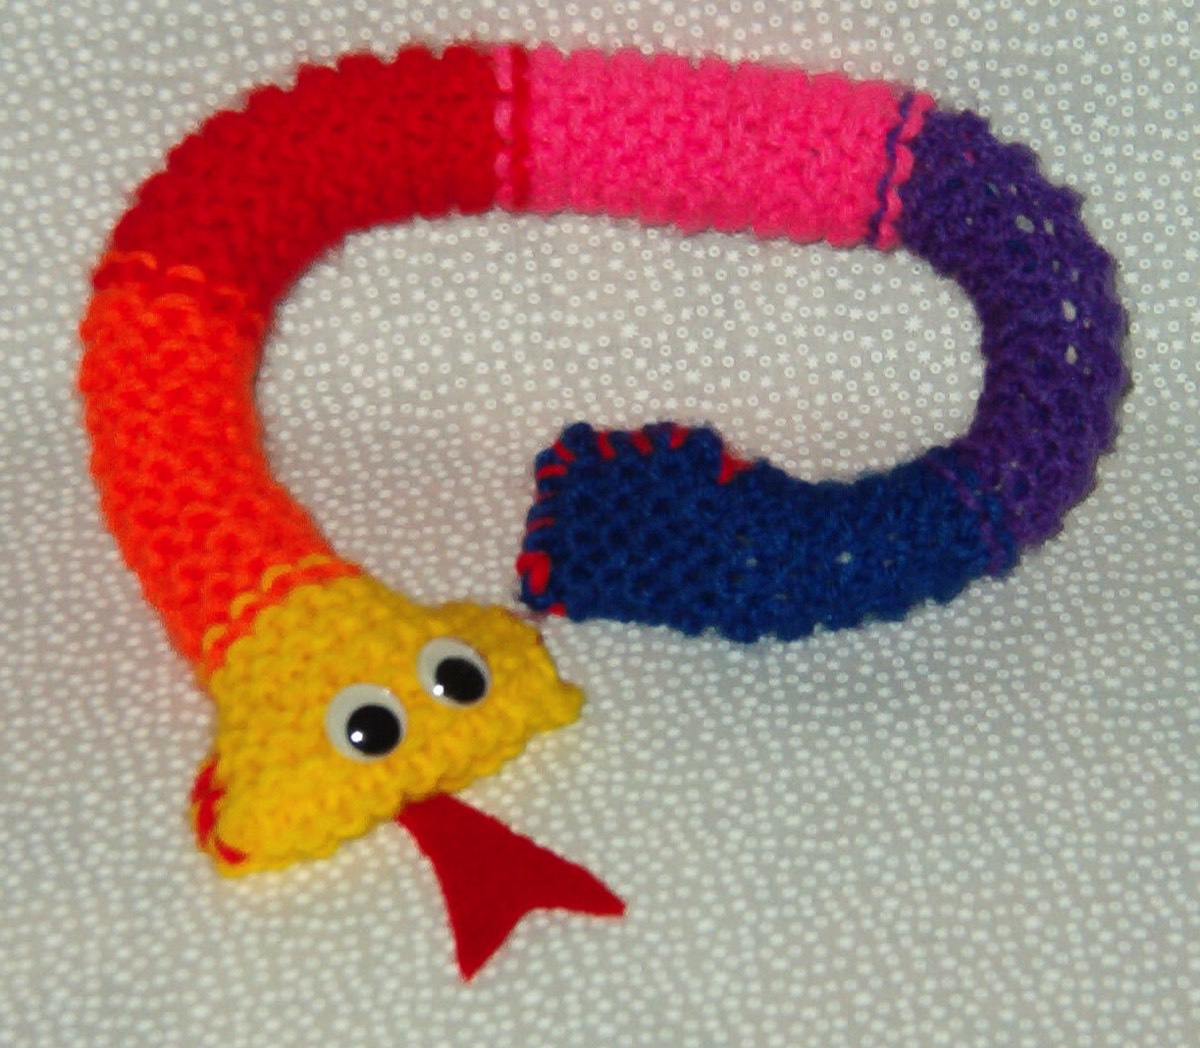
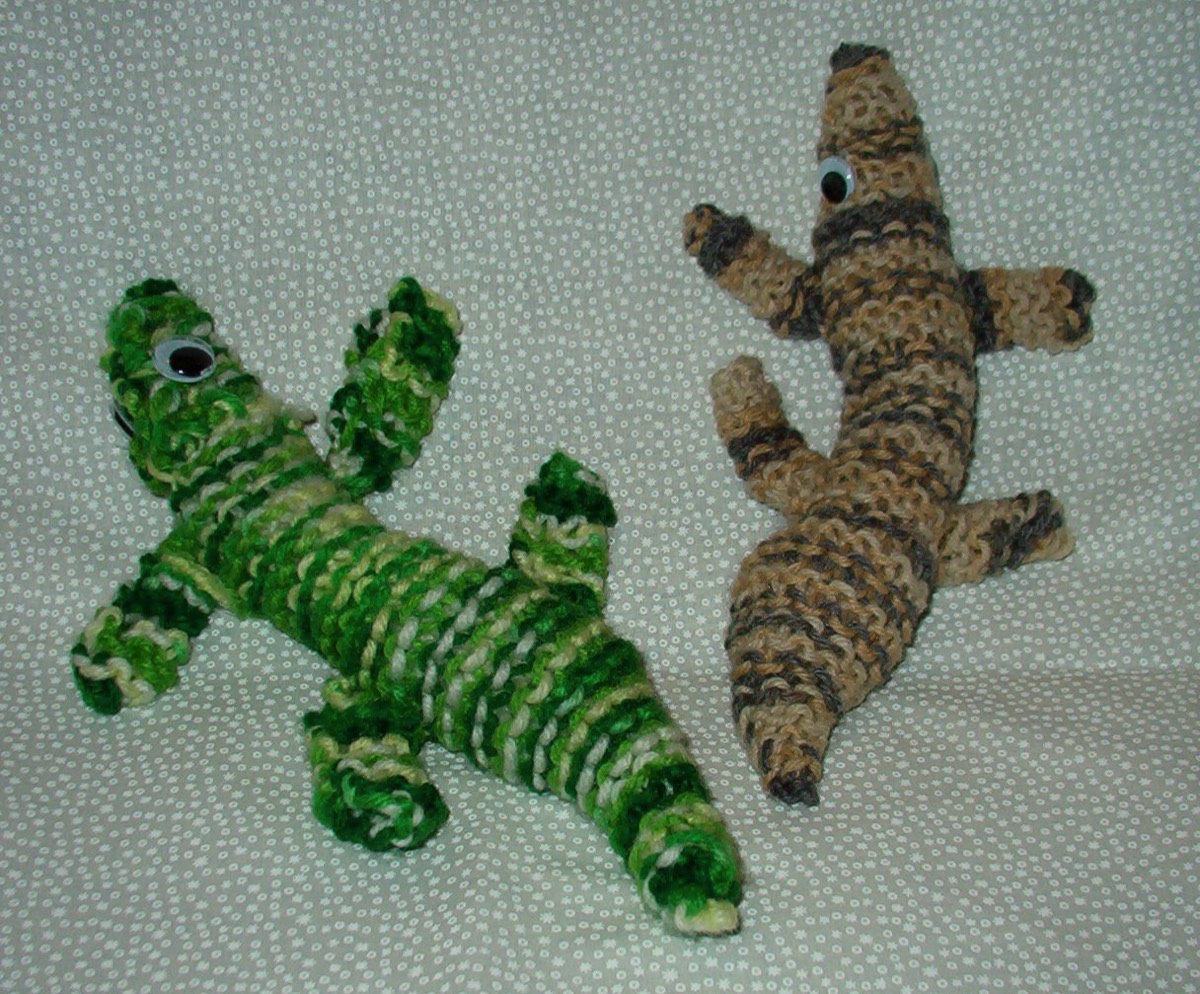
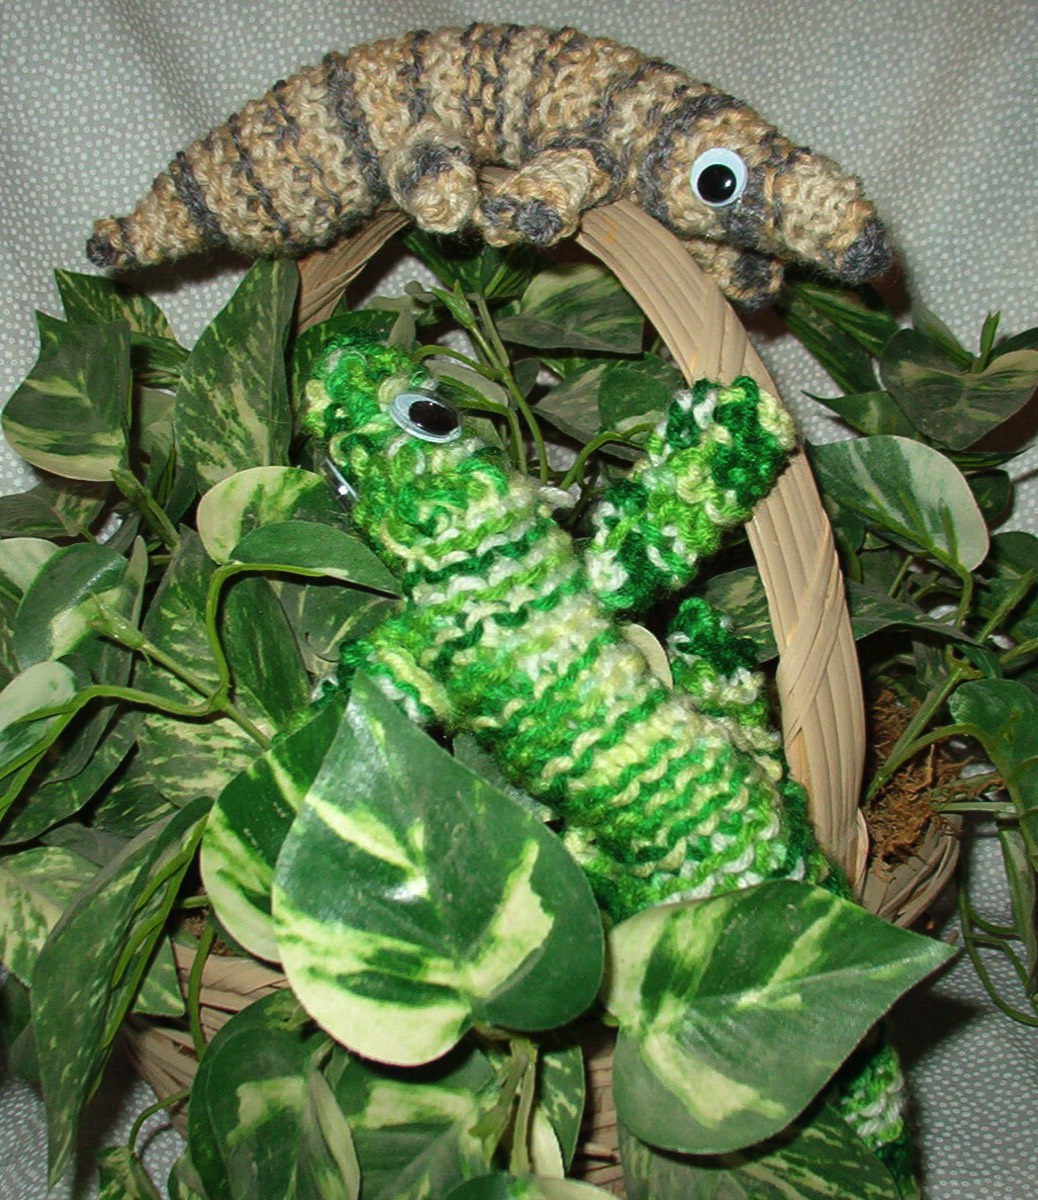
    Size 10.5 knitting needles, 5 ounces of worsted-weight yarn (I used variegated, or multicolored, yarn to make a striped pattern), safety pins, quilt batting for stuffing, wiggly eyes, material for a tongue, glue, and a sewing needle for use with yarn.
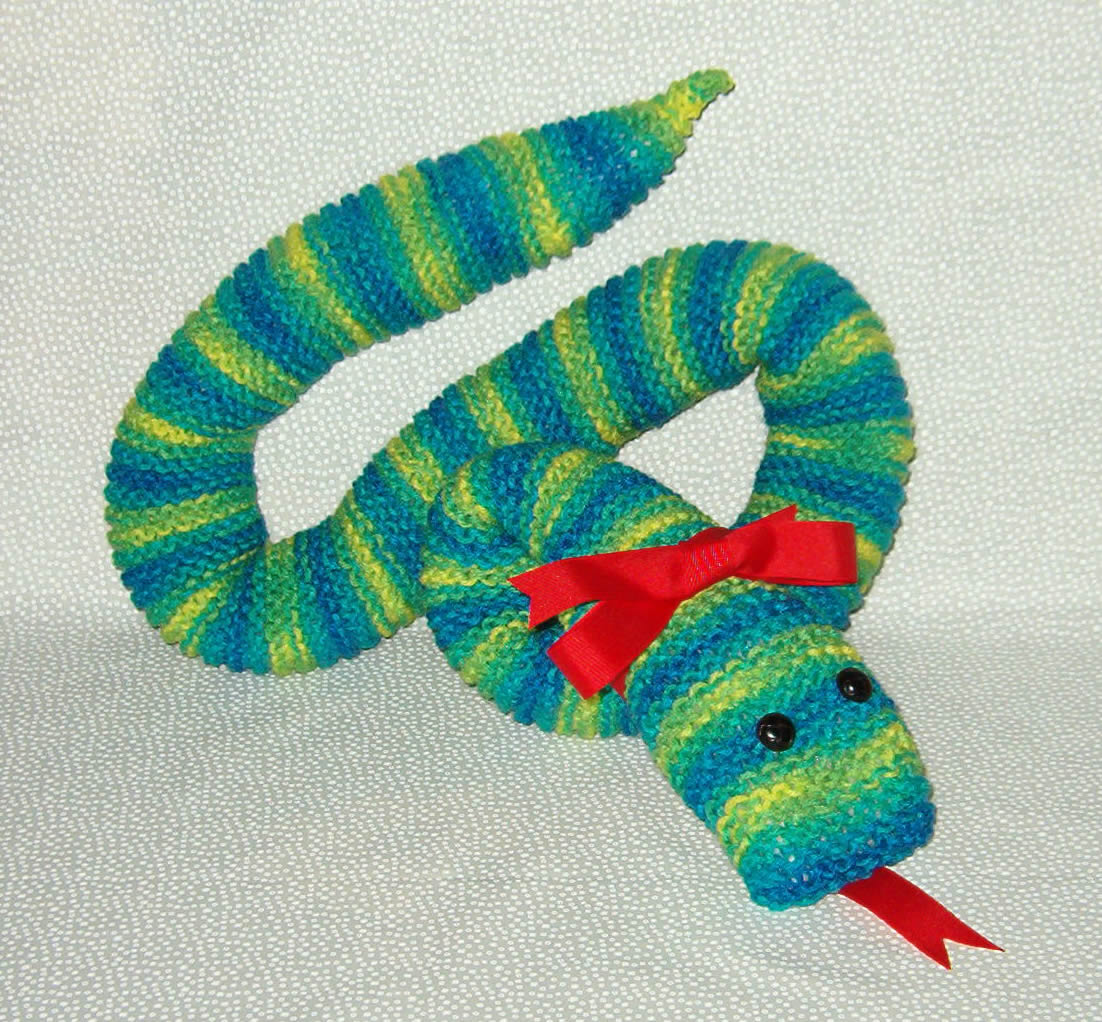
    Directions: Head

    Cast on 6 stitches. Knit 3 rows. (Knitting every row produces the garter stitch.)
    Row 4: Increase 1 stitch in the first stitch. (Inc 1) Knit 1 stitch. (K1) Increase 1 stitch in the next 2 stitches. (Inc 1; Inc 1) Knit 1 stitch. (K1) Increase 1 stitch in the last stitch (Inc 1) You should have 10 stitches (sts.) at the end of the row.
    Knit 3 rows of regular knitting.
    Note: Here is how the directions will look with the abbreviations: Inc 1, K1, Inc 1, Inc 1, K1, Inc 1. I will be using the abbreviations from here to the end of the pattern.
    Row 8: Inc 1, K2, Inc 1, K2, Inc 1, K2, Inc 1. (14 sts.)
    Knit 3 rows.
    Row 12: Inc 1, K3, Inc 1, K4, Inc 1, K3, Inc 1. (18 sts.)
    Knit 3 rows.
    Row 16: Inc 1, K4, Inc 1, K6, Inc 1, K4, Inc 1. (22 sts.)
    Knit 3 rows.
    Row 20: Inc 1, K5, Inc 1, K8, Inc 1, K5, Inc 1. (26 sts.)
    Continue to knit every row in the garter stitch for about 40 inches. (You need to save a small amount of yarn for the tail and for sewing up the snake.)

    Tail: Decrease 1 stitch (Dec 1) at the beginning and end of every other row, until you have 2 sts. left on the knitting needle. Knit the last 2 sts. together for the cast off. Leave a long tail of yarn to use to sew up the snake. You can also use smaller lengths of yarn for sewing, but remember to secure the ends so they do not come unraveled. Use a strip of quilt batting about 10 inches wide and the same length as the snake to stuff the snake, as you pin and sew the sides together. Roll the batting to fit inside the snake and stuff as you sew along the seam. You might need to trim the batting for the tail section. Hide the yarn ends by sewing them under a few stitches so they do not come undone.

    Decorate your snake with wiggly eyes and a tongue. You can use buttons or other decorations, but remember not to give these items to young children who might pull them off and put them in their mouths.


    Messmerland Knitting Pattern ©2006. Messmerland Knitting Patterns are free; not for commercial use.

    Stacks Image 299
  • Headband

    Skills Needed: Cast On, Knit, Cast Off

    Materials:

    Size 10.5 knitting needles, 1 ounce of worsted-weight yarn, and a sewing needle for use with yarn.

    Directions:

    Cast on 10 stitches.
    Knit every row (garter stitch) for 80 rows or 40 ridges. (A ridge equals 2 rows in the garter stitch.)
    Cast off, leaving a tail of yarn 18 inches long.
    Use the yarn tail and the sewing needle to sew the narrow ends of the knitted rectangle together. Be sure not to cut the end of the yarn remaining, until you weave it in and out of a few stitches on the seam of the headband. this will prevent the seam from unraveling.
    Note: you can change the length or width of the headband by adding or subtracting stitches or rows.


    Messmerland Knitting Pattern ©2006. Messmerland Knitting Patterns are free; not for commercial use.

    Stacks Image 315
  • Bean Bag - - Plain or Fancy

    Skills Needed: Cast On, Knit, and Cast Off.

    Materials:

    Size 10.5 knitting needles, 1 ounce of worsted-weight yarn, 3 safety pins, a clean stocking, dry beans or rice, and a sewing needle for use with yarn.

    Directions:

    Cast on 15 stitches.
    Knit every row for 30 rows or 15 ridges. (A ridge equals 2 rows in the garter stitch.)
    Cast off, leaving a tail of yarn about 2 feet long.
    Make a second square to match the first one you made.

    Finishing:

    Pin the matching square pieces together on 3 sides. Using one of the tails of yarn you left, sew the pieces together on 3 sides, leaving one side open for stuffing. Take the pins out and turn the bag inside out. Save one of the ends of remaining yarn to use to sew the last side. Stuff the other end inside the bag.
    Fill the toe of a clean stocking with either beans or rice. Remember, the size of the filled stocking needs to fit into the bean bag. Tie a knot so the filling will not fall out of the stocking, and put it in the open bean bag. Pin the last seam together, closing the filled stocking inside the bean bag. Sew the last seam closed, but do not cut the left-over yarn, until you hide the end by sewing it under a few stitches so it will not unravel.
    Note: You can also use soft filling to stuff the bag. You can play catch with the finished product or you can turn it into a paper weight with personality! My students love to decorate their bean bags with puff balls and funny eyes. Let you creativity take hold.
    If you do that, remember not to give the bean bag to a small child, because they might choke on the decorations or the filling.


    Happy Pumpkins designed by Kelly and Briette.
    Messmerland Knitting Patterns ©2006. Messmerland Knitting Patterns are free; not for commercial use.

    Stacks Image 317
  • Jackie's Wrist Warmers

    Skills Needed: Cast on, Knit, and Cast off.

    Materials:

    Size 10.5 knitting needles, 2 ounces of worsted-weight yarn, 2 or 3 safety pins, and a sewing needle for yarn. You will need a small amount of worsted-weight yarn in a contrasting color, if you want to add the cross-stitch decoration to the finished wrist warmers.

    Directions:

    Cast on 30 stitches. (You may make them longer by casting on more stitches.)
    Knit every row for 24 ridges. (This is the same as knitting 48 rows.)
    Cast off, leaving a tail of yarn 24 inches long. You will have a rectangle for one wrist warmer.
    Make a second rectangle to match the first.

    Finishing:

    Fold the rectangle in half lengthwise. (The rectangle should be about 8 inches long.) Use the safety pins to hold the edges evenly. Sew the edges together with the yarn sewing needle and the long tail of leftover yarn for about 5 inches. Leave an opening for your thumb about an inch long, and then sew the rest of the length closed, beyond the thumb opening. Make sure you sew the leftover yarn under some stitches so it will not unravel.
    Cross-stitch decoration may be sewn along the seams for added decoration. Use the yarn sewing needle and a contrasting color of yarn to make your wrist warmers unique. Don't forget to sew the yarn ends under some of the seam stitches so they do not unravel.
    These wrist warmers are great for keeping your hands warm while you are on the computer or while you are knitting! (I am wearing them while I am typing these instructions.) Jackie sometimes make them in different colors and trades them with her friends.


    Messmerland Knitting Pattern ©2007. Messmerland Knitting Patterns are free; not for commercial use.

    Stacks Image 319
  • Small Blanket - - For Dolls or Pets

    Skills Needed: Cast On, Knit, Increase, Decrease, and Cast Off.

    Note: There will be some directions using abbreviations in this pattern. They will be explained the first time they appear, but the next time they are used, you will see just the shorter way to write them.

    Materials:

    Size 10.5 needles, 3 ounces of worsted-weight yarn, and a sewing needle for yarn.

    Directions:

    Cast on 4 stitches.
    Knit 3 rows.
    Row 4: Knit 2 stitches (K2); increase one stitch in the next stitch (inc 1); knit to the end of the row. (You are adding one stitch to each row.)
    Continue to inc 1 in each row, until there are 80 stitches on your needle.
    Next row: K2; knit the next 2 stitches together (K2 tog) by putting the needle, from left to right, through both stitches at the same time, for a decrease of one stitch; knit to the end of the row. (You are taking away one stitch from each row, now.)
    Continue decreasing one stitch on each row until you have 5 stitches left.
    Last row: K2; K2 tog; K1.
    Cast off the remaining 4 stitches, leaving a 6 inch tail of yarn.

    Finishing:

    Use the yarn needle to hide the tails from the beginning and end of the blanket, by running them under a few stitches.


    Messmerland Knitting Patterns ©2006. Messmerland Knitting Patterns are free; not for commercial use.

    Stacks Image 321
  • Anna's Gorgeous Gecko

    Skills needed: Cast on, Knit, Increase, Decrease, and Cast Off.

    Materials:

    Size 10.5 needles, one ounce of worsted weight yarn, a sewing needle for yarn, wiggly eyes or buttons, and a filling of your choice. (Anna and I filled a piece of pantyhose leg with a little rice and tied it at both ends.)
    Note: Anna's pattern is inspired by her own leopard gecko. She chose a mixed green colored yarn. Mine looks more like an African fat-tailed gecko, in shades of brown. You can change the color of your creature and make it into anything you like.

    Directions:

    Body: Cast on 2 stitches. Knit 2 rows. Increase 1 stitch in the first stitch and 1 stitch in the last stitch for a total of 4 stitches. Knit 3 rows. Increase 1 stitch in the first and last stitch of the next row and every 4th row, until there are 12 stitches in all. Knit on the 12 stitches for 30 rows more. Decrease 1 stitch (by knitting 2 stitches together) at the beginning and end of the next row and every 4th row until there are only 4 stitches left. Cast off the last 4 stitches, leaving a tail of yarn 24 inches long.

    Feet: (Make 4) Cast on 6 stitches. Knit every row for twelve rows or six ridges. Cast off leaving a tail of yarn 12 inches long.

    Finishing:

    Sew the body together using the yarn sewing needle and the long tail of yarn left from casting off. Don't forget to put the stuffing into the body before it is all sewn up. You may want to use the rice and stocking idea or some other type of filling for your lizard. Fold each foot in half length-wise and sew each one down the side. Then sew the feet into position on the body. Be careful not to sew through the stocking if you have rice inside.


    Add the wiggly eyes to the gecko with some glue or sew some buttons on the head. Which end is the head?
    That is entirely up to you!
    Messmerland Knitting Patterns © 2007. Messmerland Knitting Patterns are free; not for commercial use.

    Stacks Image 323
    Stacks Image 339
  • Stacey's Perfect Penguin*

    This is a variation of the Bean Bag pattern which was designed by one of my students.

    Skills Needed: Cast On, Knit, Decrease, and Cast Off.

    Materials:

    Size 10.5 knitting needles, worsted-weight yarn (1 ounce each of black, white, and a color for the hat and scarf) a sewing needle for yarn, wiggly eyes, and material for the feet and beak. Craft foam or felt works well for the feet and beak.

    Directions:

    Front: Cast on 30 stitches with the white yarn. Using the garter stitch (knit every row) knit 13 ridges. (26 rows) Cast off.
    Back: Using the black yarn, make a piece identical to the front.
    Wing: Cast on 15 stitches with the black yarn. At the beginning of each row, knit 2 stitches together (for a decrease of one stitch) and knit to the end of the row. Continue to decrease one stitch for each row until you have 1 stitch left. Cast off, leaving a tail of yarn 24 inches long. Make a second wing identical to the first one.
    Scarf: Cast on 5 stitches in the color of your choice. Knit every row for 55 ridges. Cast off.
    Hat: Cast on 30 stitches. Knit 8 ridges. Knit 2 stitches together across the next 2 rows. There will be one stitch left over on the last row to knit at the end of the row. Do not cast off. Cut the yarn 20 inches long and thread the yarn sewing needle with it. Use the sewing needle to thread through each of the stitches left on the knitting needle as you take them off the knitting needle. Pull the stitches tightly to make the crown of the hat and sew the sides of the hat together neatly. Hide the ends of the yarn under some stitches before you cut them. You can add a pom pom to the top of the hat, if you wish.

    Finishing:

    Pin and sew the white and black pieces together and stuff them. Using the 24 inch tail of yarn, sew the wings on the sides of the body with the longest edge of the triangle next to the penguin's side seam. Use a glue gun to add eyes, feet and a beak. Dress your "Perfect Penguin" in the hat and scarf.

    *Try to make you own variation of this pattern. There is a bunny and a pig in the picture. They were made by adding small knitted shapes to the basic body of the penguin pattern, using different colors of yarn. Other decorations were then glued in place.


    Messmerland Knitting Patterns ©2006. Messmerland Knitting Patterns are free; not for commercial use.

    Stacks Image 325
    Stacks Image 344
  • Pom Pom Hat

    Skills Needed: Cast On, Knit, Knit 2 Stitches together (k2 tog), and Cast Off.

    Materials:

    Size 10.5 knitting needles, (1) 3.5 ounce skein of worsted-weight yarn, safety pins, and a sewing needle for use with yarn.

    Directions:

    Cast on 70 stitches.
    Knit every row until the piece measures 16 cm.
    Decrease for the top of the hat:
    1st row: K2 (this means knit 2 stitches), *K 2 tog (knit 2 stitches together by putting the needle through 2 stitches from left to right), K4. Repeat the section of directions from the * to the end of the row. You should have 58 stitches left. Knit 3 rows in regular garter stitch.
    5th row: K2, *K2 tog, K3. Repeat the section from the * to the end of the row. You should have 42 stitches. Knit 3 rows.
    9th row: K2, *K2 tog, K2. Repeat the section from the * to the end of the row. You should have 36 stitches. Knit 3 rows.
    13th row: K2, *K2 tog, K1. Repeat the section from the * to the end of the row. There will be one stitch left over on the last row to knit at the end of the row. You should have 25 stitches. Knit 1 row.
    15th row: K2 tog across the entire row; K1. You should have 13 stitches left. Do not cast off. Cut the yarn leaving an end 30 cm long.

    Finishing:

    Thread a yarn sewing needle with the 30 cm yarn end. Use the sewing needle to thread through each of the stitches left on the knitting needle as you take them off the knitting needle. Pull the thread through the stitches so the stitches are gathered tightly to make the crown of the hat. Fasten securely with a few small stitches and sew the sides of the hat together neatly. Hide the ends of the yarn under some stitches before you cut them. You can add a pom pom to the top of the hat, if you wish.


    Messmerland Knitting Pattern ©2006. Messmerland Knitting Patterns are free; not for commercial use.

    Stacks Image 327
  • Michelle's Lavender Sachet

    (A sachet is a little bag filled with sweet-smelling dried flowers or other fragrant stuffing that people put in dresser drawers to make their clothing smell nice.)

    Skills Needed: Cast On, Knit, and Cast Off.

    Materials:

    Size 10.5 needles, 1 ounce of each of two colors of worsted weight yarn, a yarn sewing needle, a small amount of cloth to make the pouch for the lavender filling, lavender flowers or something else that smells nice, and a regular sewing needle and thread.

    Directions:

    Cast on 20 stitches holding both colors of yarn as one.
    Knit every row for 24 ridges (48 rows).
    Cast off, leaving a tail 24 inches long.

    Finishing:

    Fold piece in half and sew three sides together using the tail of yarn from the cast off row. Make a pouch to hold the lavender or other filling and insert the pouch into the knitted pocket you made. Sew the end closed.
    Note: You can embroider a design on the sachet or decorate it any way you like. Michelle embroidered a crown on the front of her sachet for a final touch.


    Messmerland Knitting Pattern ©2008. Messmerland Patterns are free; not for commercial use.

    Stacks Image 329